CONSTRUCTION IN GENERAL

LEAVING YOUR LIFE WITH MORE STYLE!

OUR SERVICES

BEFORE AND AFTER

+ 0
Completed Projects
% 0
Customer satisfaction
Completed Project
89%
Customer satisfaction
100%

ABOUT US

Introducing  EZ FINISH CARPENTRY: Your Trusted Partner for general Carpentry services.

Previous slide
Next slide

Excellent service

Rated 5.0 out of 5
October 6, 2023

Really professional service. Attention to detail and very efficient. Have recommended this company to many people. Also great communication with the owner. Pricing is also very fair. Highly recommend! A ++

Natasha

Recommended

Rated 5.0 out of 5
June 16, 2023

Hello my name is Saeng and you come highly recommended from a friend of ours. Was wondering if you do service in the Weymouth area?

Saeng

Recommend

Rated 5.0 out of 5
November 28, 2022

Recommend. Good and clean job

Willmore Gómez

Great Service

Rated 5.0 out of 5
November 28, 2022

EZ is always thorough and attentive. Definitely worth the hire!

Bethany Joy

MAKE YOUR COMMENTS HERE

We'd love to hear from you

Contact Us

Your message is very important to us, we will get back to you as soon as possible.

Reach us through

© 2023 Developed by ACTOS MIDIA.

About Us

Play Video

Introducing EZ Finish Carpentry: Elevating Spaces with Precision Craftsmanship

At EZ Finish Carpentry, we take pride in transforming houses into homes and commercial spaces into showcases of exquisite craftsmanship. As a leading finish carpentry company, we bring a touch of elegance and precision to every project, ensuring that the final result exceeds your expectations.

Our Commitment to Excellence:

At the heart of our company is an unwavering commitment to excellence. We understand that the finer details make all the difference, and that’s why our team of skilled carpenters is dedicated to delivering unparalleled quality in every aspect of finish carpentry. From intricate moldings to custom cabinetry, we approach each project with a meticulous eye for detail and a passion for perfection.

Craftsmanship Beyond Measure:

EZ Finish Carpentry is synonymous with unparalleled craftsmanship. Our team consists of highly trained and experienced carpenters who take pride in their work. Whether it’s creating bespoke furniture pieces, installing intricate trim work, or crafting custom-built-ins, our artisans bring a level of skill and artistry that sets us apart in the industry.

Custom Solutions for Every Space:

We understand that each space is unique, and our approach reflects that. At EZ Finish Carpentry, we collaborate closely with our clients to understand their vision and design preferences. This collaborative process ensures that our finish carpentry solutions are not only visually stunning but also tailored to suit the individual style of each client.

Range of Services:

Our expertise extends across a comprehensive range of finish carpentry services, including:

  1. Trim and Molding: Elevate the aesthetic appeal of your space with our expertly crafted trim and molding installations.
  2. Cabinetry: From kitchen remodels to custom-built closets, our cabinetry solutions combine functionality with timeless design.
  3. Custom Furniture: Create a one-of-a-kind statement piece with our bespoke furniture design and craftsmanship.
  4. Built-ins: Maximize space and organization with our custom-built shelving and storage solutions.
  5. Door and Window Installation: Upgrade your home’s entrance with precision door and window installations that enhance both security and style.

Why Choose EZ Finish Carpentry:

  1. Experience: With years of experience in the industry, we bring a wealth of knowledge to every project.
  2. Quality Materials: We source and use only the finest materials to ensure durability and longevity.
  3. Client-Centric Approach: Your satisfaction is our priority. We work closely with you to bring your vision to life.
  4. Attention to Detail: It’s the little details that make a big difference, and we take pride in getting them just right.

Transform your space with the artistry and precision of EZ Finish Carpentry. Contact us today to discuss your project and discover how we can turn your vision into reality.

Kitchen Remodeling

Kitchen remodeling is a popular and rewarding home improvement project that can transform the heart of your home into a more functional, aesthetically pleasing space. Whether you’re looking to enhance the resale value of your home or simply create a more enjoyable and efficient cooking environment, a well-planned kitchen remodel can make a significant difference. Here’s a comprehensive guide to help you navigate the exciting journey of kitchen remodeling:

  1. Planning and Budgeting:
  • Assessment: Begin by evaluating your current kitchen space. Identify what works well and what needs improvement.
  • Budget: Determine your budget early on. This will guide your decisions throughout the remodeling process.
  1. Design and Layout:
  • Functionality: Prioritize functionality in your kitchen design. Consider the kitchen work triangle (the relationship between the stove, sink, and refrigerator) for an efficient layout.
  • Style: Choose a design style that complements your overall home aesthetic. Popular styles include modern, traditional, farmhouse, and transitional.
  1. Cabinetry:
  • Quality: Invest in high-quality cabinets for durability. Consider custom or semi-custom options to maximize storage and fit your specific needs.
  • Finishes: Choose cabinet finishes that align with your style. Options include stained wood, painted, or laminate finishes.
  1. Countertops:
  • Materials: Select a countertop material that suits your lifestyle and aesthetic preferences. Common choices include granite, quartz, marble, and butcher block.
  • Maintenance: Consider the maintenance requirements of different materials. Some are more resistant to stains and scratches than others.
  1. Appliances:
  • Efficiency: Opt for energy-efficient appliances to save on utility costs and reduce your environmental impact.
  • Integration: Plan for seamless integration of appliances into your kitchen design, such as built-in ovens or hidden refrigerators.
  1. Flooring:
  • Durability: Choose flooring materials that can withstand the demands of a kitchen environment. Options include tile, hardwood, laminate, and vinyl.
  • Comfort: Consider flooring that provides comfort for standing, as kitchens often involve a lot of time on your feet.
  1. Lighting:
  • Task Lighting: Install task lighting under cabinets to illuminate workspaces. Pendant lights over the kitchen island can add both functionality and style.
  • Natural Light: Maximize natural light with well-placed windows or skylights.
  1. Color Scheme:
  • Balance: Create a balanced color scheme that reflects your style. Consider neutral tones for a timeless look and add pops of color through accessories.
  1. Storage Solutions:
  • Organization: Invest in smart storage solutions such as pull-out shelves, drawer dividers, and pantry organizers.
  • Space Utilization: Make the most of every inch of available space, including utilizing vertical storage.
  1. Professional Help:
  • Contractors: Hire reputable contractors for major renovations. Check references and reviews to ensure quality work.
  • Permits: Be aware of local building codes and obtain any necessary permits for construction work.
  1. Timeline:
  • Realistic Expectations: Understand that kitchen remodeling takes time. Be prepared for unexpected delays and plan accordingly.
  1. Final Touches:
  • Accessories: Add finishing touches with stylish accessories like cabinet hardware, faucets, and decorative elements.
  • Personalization: Infuse your personality into the space with artwork, plants, and other personal touches.

Remember, a well-executed kitchen remodel not only enhances the functionality of your space but also adds value to your home. Take the time to plan thoroughly, choose quality materials, and enjoy the process of transforming your kitchen into a beautiful and functional space.

Finished Carpentry

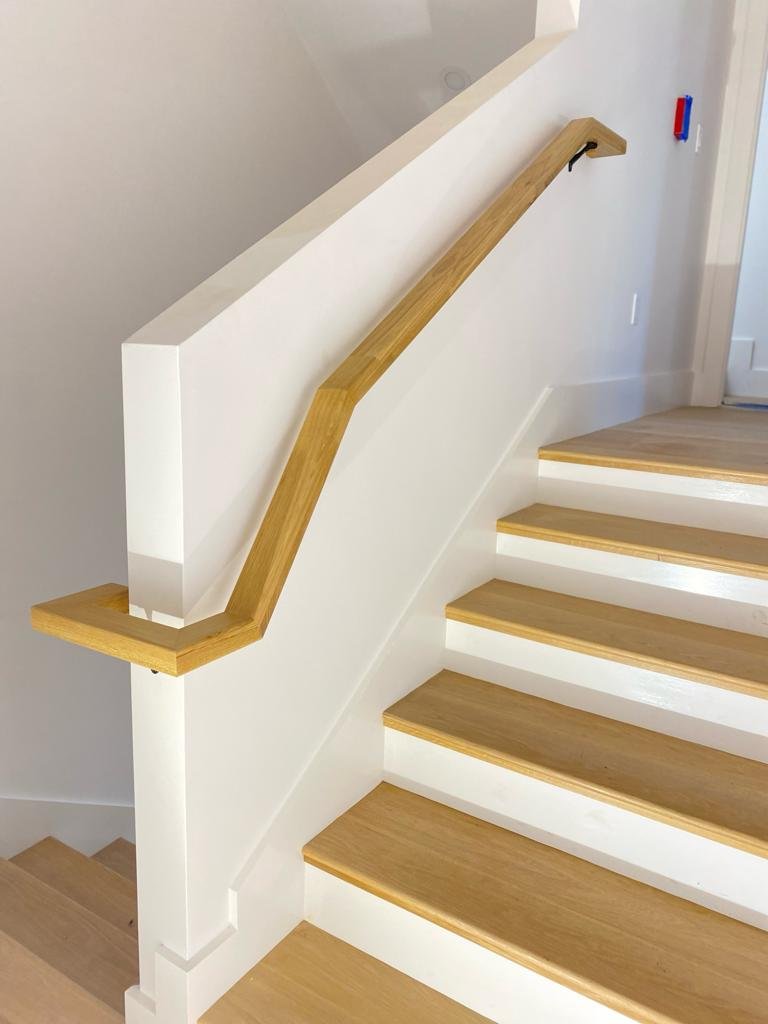
Finish carpentry is a specialized skill within the broader field of carpentry that focuses on the final touches and aesthetic details of a construction project. This type of carpentry involves the installation of interior and exterior trim, molding, and other decorative elements that give a polished and refined appearance to a building. Here’s a comprehensive overview of finish carpentry:

  1. 1-Interior Finish Carpentry:
  • Trim and Moldings: Installation of baseboards, crown molding, chair rails, and other decorative moldings to enhance the visual appeal of rooms.
  • Wainscoting: Adding wainscoting panels to walls, providing an elegant and decorative element.
  • Built-in Furniture: Crafting and installing built-in features such as bookshelves, window seats, and custom cabinetry.
  1. 2-Doors and Windows:
  • Door Installation: Hanging and fitting doors, including the installation of frames, hinges, and handles.
  • Window Casings: Installing window casings and sills to complete the look and improve insulation.
  1. 3-Cabinetry and Countertops:
  • Custom Cabinetry: Designing, building, and installing custom cabinets tailored to the specific needs and style of a space.
  • Countertop Edging: Applying decorative edging to countertops for a finished appearance.
  1. 4-Stairs and Railings:
  • Staircase Balustrades: Crafting and installing balusters, newel posts, and handrails for aesthetically pleasing and safe staircases.
  • Railings: Installing interior and exterior railings, ensuring both safety and visual appeal.
  1. 5-Flooring Transitions:
  • Base Shoe Molding: Adding base shoe molding along the bottom of baseboards to create a finished look and cover gaps.
  • Thresholds: Installing thresholds between different types of flooring to create smooth transitions.
  1. 6-Ceiling Details:
  • Coffered Ceilings: Designing and installing coffered ceilings for a classic and sophisticated look.
  • Crown Molding: Adding crown molding to enhance the visual appeal of ceilings.
  1. 7-Material Selection:
  • Woodworking Techniques: Utilizing various woodworking techniques to create intricate details and designs.
  • Material Choices: Selecting appropriate materials, including hardwoods, softwoods, and composite materials, based on durability, aesthetics, and budget.
  1. 8-Precision and Detail:
  • Measuring and Cutting: Ensuring precise measurements and accurate cuts for a seamless fit of trim and moldings.
  • Attention to Detail: Paying close attention to details, such as joints and seams, to create a polished and cohesive finish.
  1. 9-Tools of the Trade:
  • Finishing Tools: Using a variety of hand and power tools, including miter saws, coping saws, and pneumatic nail guns, to achieve precise results.
  • Finishing Techniques: Employing techniques such as staining, painting, and varnishing to enhance the appearance of finished woodwork.
  1. 10-Collaboration with Other Trades:
  • Coordination: Collaborating with other construction professionals, such as architects and electricians, to ensure a cohesive and well-integrated final product.
  1. 11-Customer Interaction:
  • Communication: Effectively communicating with clients to understand their preferences and expectations.
  • Problem-Solving: Addressing any challenges that may arise during the finish carpentry process with creativity and skill.

Finish carpentry requires a blend of artistic vision, technical skill, and attention to detail. Whether it’s creating custom cabinetry, installing intricate moldings, or crafting beautiful staircases, finish carpenters play a crucial role in elevating the overall aesthetic and value of a building.

Bathroom remodeling is a popular home improvement project that aims to enhance the functionality, aesthetics, and overall comfort of one of the most-used spaces in a home. Whether you’re looking to update the style, increase storage, or improve energy efficiency, a well-executed bathroom remodel can significantly transform your living space. Here’s a comprehensive guide to help you navigate the process of bathroom remodeling:

1. Assessment and Planning:

  • Needs and Goals: Identify your specific needs and goals for the remodel. Consider whether you want to increase storage, improve accessibility, or simply update the look of the space.
  • Budget: Determine your budget, including a contingency fund for unexpected expenses.
  •  
  • 2. Design and Layout:
  • Space Utilization: Optimize the layout to make the most of available space. Consider fixtures, storage, and traffic flow.
  • Style Choices: Choose a design style that suits your taste and complements the overall aesthetic of your home.
  •  
  • 3. Fixtures and Features:
  • Bathtub/Shower: Decide whether you want a bathtub, a shower, or a combination of both. Consider features like built-in seating, multiple showerheads, or a spa-like tub.
  • Toilet: Choose a toilet that is water-efficient and suits the design of the bathroom.
  • Sinks and Vanities: Select sinks and vanities that provide the right balance of style and functionality. Consider storage options, countertop materials, and faucet styles.
  •  
  • 4. Flooring and Walls:
  • Water-Resistant Materials: Opt for flooring and wall materials that can withstand moisture. Tile, vinyl, and waterproof laminate are popular choices.
  • Color and Texture: Choose colors and textures that contribute to the desired ambiance of the bathroom.
  •  
  • 5. Cabinetry and Storage:
  • Vanity Cabinets: Invest in quality vanity cabinets to maximize storage space. Consider custom or semi-custom options.
  • Medicine Cabinets and Shelving: Add additional storage with medicine cabinets, built-in shelving, or standalone cabinets.
  •  
  • 6. Lighting:
  • Task Lighting: Ensure adequate lighting around the mirror for grooming tasks. Consider adding sconces or a well-lit vanity mirror.
  • Ambient Lighting: Incorporate ambient lighting for overall illumination. Skylights or a well-placed window can introduce natural light.
  •  
  • 7. Ventilation:
  • Proper Ventilation: Install an efficient ventilation system to prevent mold and mildew growth. Consider features like exhaust fans or operable windows.
  •  
  • 8. Plumbing and Fixtures Installation:
  • Professional Plumbing Installation: Hire a licensed plumber for the installation of fixtures and plumbing connections. Ensure proper ventilation for plumbing systems.
  •  
  • 9. Accessibility Considerations:
  • Universal Design: If applicable, consider incorporating universal design principles for accessibility, such as barrier-free showers and grab bars.
  •  
  • 10. Finishing Touches:
  • Hardware and Accessories: Select stylish hardware, faucets, and accessories to complement the overall design.
  • Mirrors: Choose mirrors that enhance the aesthetic appeal of the bathroom while serving their functional purpose.
  •  
  • 11. Timeline and Project Management:
  • Realistic Timeline: Understand that bathroom remodeling projects can take time. Plan accordingly and be prepared for potential delays.
  • Project Management: If hiring professionals, coordinate with contractors and ensure open communication throughout the project.
  •  
  • 12. Maintenance and Cleaning:
  • Easy Maintenance: Choose materials and finishes that are easy to clean and maintain.
  • Regular Inspection: Periodically inspect for potential issues and address them promptly to prevent costly repairs.

A well-thought-out bathroom remodel can add value to your home while providing you with a more enjoyable and functional space. Whether you’re creating a luxurious spa retreat or a practical and efficient family bathroom, careful planning and attention to detail are key to a successful project.

Custom woodworking is a skilled craft that involves designing, creating, and installing bespoke wood products tailored to the unique needs and preferences of clients. From custom furniture pieces to intricate cabinetry and decorative woodwork, custom woodworking adds a personalized touch to homes and commercial spaces. Here’s a comprehensive overview of the world of custom woodworking:

1. Design and Consultation:

  • Client Collaboration: Custom woodworking begins with a thorough consultation with the client. Understanding their vision, preferences, and functional requirements is crucial.
  • Design Process: Skilled woodworkers collaborate with clients to create detailed designs, considering both aesthetics and functionality.
  •  
  • 2. Materials Selection:
  • Wood Choices: The selection of wood species is a critical aspect of custom woodworking. Different woods offer varied aesthetics, durability, and workability. Common choices include oak, maple, cherry, walnut, and exotic hardwoods.
  • Finish Options: Clients can choose from a variety of finishes, including stains, paints, varnishes, or natural oils, to achieve the desired look for the finished product.
  •  
  • 3. Furniture and Cabinetry:
  • Custom Furniture: Craftsmen can create unique furniture pieces such as tables, chairs, bed frames, and more, designed to fit specific spaces or match existing decor.
  • Cabinetry: Tailored cabinetry solutions for kitchens, bathrooms, and other areas, optimizing storage and seamlessly blending with the overall design of the space.
  •  
  • 4. Built-Ins and Storage Solutions:
  • Built-In Shelving: Custom woodworkers design and install built-in shelving units to maximize storage while complementing the style of the room.
  • Wardrobes and Closets: Crafting custom wardrobes and closets that meet the specific storage needs and aesthetic preferences of the client.
  •  
  • 5. Architectural Woodwork:
  • Trim and Molding: Custom woodworking includes the creation and installation of decorative trim, crown molding, and baseboards to enhance the architectural character of a space.
  • Wainscoting and Paneling: Crafting and installing wainscoting and paneling to add elegance and texture to walls.
  •  
  • 6. Doors and Windows:
  • Custom Doors: Designing and building custom doors that match the style of the home or business, whether traditional, modern, or rustic.
  • Window Frames: Crafting custom window frames and sills to enhance the overall aesthetic and functionality of windows.
  •  
  • 7. Specialty Woodworking:
  • Staircases: Designing and constructing custom staircases, including handrails, balusters, and newel posts, to add a distinctive architectural element.
  • Unique Wood Features: Crafting one-of-a-kind wood features such as mantels, wine racks, and decorative carvings.
  •  
  • 8. Woodturning and Carving:
  • Woodturning: Creating turned wood elements such as table legs, balusters, and decorative spindles using a lathe.
  • Carving: Incorporating intricate hand-carved details into furniture or architectural elements for a personalized touch.
  •  
  • 9. Precision and Craftsmanship:
  • Attention to Detail: Custom woodworkers take pride in their attention to detail, ensuring precise measurements, joints, and finishes.
  • Handcrafted Quality: Many custom woodworking projects involve a high level of handcraftsmanship, showcasing the skill and artistry of the woodworker.
  •  
  • 10. Collaboration with Clients and Other Professionals:
  • Communication: Effective communication with clients is essential throughout the design and construction process.
  • Collaboration with Other Trades: Custom woodworkers often collaborate with architects, interior designers, and contractors to ensure seamless integration with other elements of a project.

Custom woodworking brings a level of artistry and individuality to spaces, creating pieces that reflect the unique personality and preferences of the client. Whether it’s a statement furniture piece, a meticulously crafted staircase, or custom cabinetry, the world of custom woodworking is a celebration of craftsmanship and creativity.

Deck and porch building are popular home improvement projects that enhance outdoor living spaces, providing areas for relaxation, entertainment, and enjoyment of the surrounding environment. Whether attached to the house or freestanding, well-designed decks and porches can significantly increase the functionality and curb appeal of a home. Here’s a comprehensive guide to the world of deck and porch building:

  1. Planning and Design:
  • Site Assessment: Evaluate the site to determine the optimal location for the deck or porch, considering factors like sunlight, accessibility, and views.
  • Functionality: Define the intended use of the space, whether it’s for dining, entertaining, or simply relaxing. This will influence the design and layout.
  1. Materials Selection:
  • Decking Materials: Choose from a variety of decking materials such as wood (cedar, redwood, or pressure-treated lumber), composite, or PVC for durability, aesthetics, and maintenance requirements.
  • Railing and Balusters: Select railing materials and styles that complement the overall design. Options include wood, metal, glass, or composite.
  1. Permits and Building Codes:
  • Local Regulations: Check local building codes and obtain necessary permits before starting construction.
  • Structural Considerations: Ensure the structure complies with load-bearing requirements and safety standards.
  1. Foundation and Framing:
  • Foundation Type: Choose between a concrete slab, piers, or helical piles based on soil conditions and local building requirements.
  • Framing Structure: Construct a sturdy framing structure using pressure-treated lumber or other suitable materials, ensuring proper spacing and support.
  1. Decking Installation:
  • Deck Board Orientation: Install decking boards with proper spacing to allow for drainage and expansion.
  • Hidden Fasteners: Consider using hidden fasteners for a clean and streamlined appearance.
  1. Porch Roof or Cover:
  • Roof Design: Determine whether the porch will have a pitched roof, flat roof, or pergola-style cover.
  • Material Selection: Choose roofing materials that complement the overall design and provide adequate protection from the elements.
  1. Stairs and Access:
  • Stair Design: Design and construct stairs with proper rise and run dimensions for safety and ease of use.
  • Handrails and Guardrails: Install handrails and guardrails where necessary, ensuring compliance with local building codes.
  1. Finishing Touches:
  • Deck and Porch Skirting: Consider adding skirting around the deck or porch for a polished appearance and to conceal structural elements.
  • Trim and Moldings: Install decorative trim and moldings to add a finished look to the edges and corners.
  1. Lighting and Accessories:
  • Ambient Lighting: Incorporate lighting elements such as post caps, step lights, or string lights to enhance usability in the evening.
  • Outdoor Furniture: Choose outdoor furniture that complements the style and purpose of the deck or porch.
  1. Sealing and Staining:
  • Preservation: Apply a sealant or stain to protect the wood from the elements and prolong its lifespan.
  • Maintenance Schedule: Establish a regular maintenance schedule for cleaning, sealing, and inspecting the structure.
  1. Landscaping Integration:
  • Planters and Greenery: Integrate planters and landscaping elements to soften the transition between the deck or porch and the surrounding yard.
  • Outdoor Decor: Personalize the space with outdoor decor such as potted plants, rugs, and cushions.
  1. Safety Considerations:
  • Slip-Resistant Surfaces: Choose decking materials that provide a slip-resistant surface, especially in wet conditions.
  • Child and Pet Safety: Implement safety measures, such as gates or netting, for families with children or pets.

Whether you’re envisioning a sprawling deck for large gatherings or a cozy porch for quiet evenings, careful planning, quality materials, and skilled craftsmanship are essential for successful deck and porch building projects. These outdoor spaces can become cherished extensions of your home, providing a comfortable and inviting environment for years to come.

House remodeling is a transformative process that involves updating, renovating, or completely changing the structure and design of a home. Whether driven by a desire for modernization, improved functionality, or increased resale value, house remodeling allows homeowners to tailor their living spaces to better suit their needs and preferences. Here’s a comprehensive guide to house remodeling:

  1. Assessment and Planning:
  • Needs and Goals: Identify the reasons for remodeling, whether it’s to enhance aesthetics, improve functionality, or address structural issues.
  • Budget: Establish a realistic budget, considering both the cost of materials and labor. Include a contingency fund for unforeseen expenses.
  1. Scope of Work:
  • Interior vs. Exterior: Determine whether the focus will be on interior spaces, exterior elements, or a combination of both.
  • Room-Specific Remodeling: Assess specific areas like kitchens, bathrooms, bedrooms, or living spaces that may require attention.
  1. Design and Conceptualization:
  • Architectural Design: Collaborate with architects or designers to develop detailed plans that align with your vision.
  • Style Choices: Decide on the overall design style, whether it’s contemporary, traditional, farmhouse, or a personalized blend of styles.
  1. Structural Changes:
  • Wall Removal/Addition: Consider structural changes such as removing or adding walls to create open-concept spaces or additional rooms.
  • Foundation Upgrades: Address any foundation issues and make necessary upgrades for stability.
  1. Kitchen Remodeling:
  • Cabinetry and Countertops: Upgrade cabinets and countertops for both aesthetics and functionality.
  • Appliance Updates: Install modern, energy-efficient appliances for improved efficiency.
  1. Bathroom Renovation:
  • Fixtures and Finishes: Replace or upgrade bathroom fixtures, including sinks, faucets, showerheads, and lighting.
  • Tiling and Flooring: Consider new tile or flooring options for a fresh and updated look.
  1. Flooring Replacement:
  • Material Choices: Select flooring materials that align with the function of each space. Options include hardwood, laminate, tile, carpet, or luxury vinyl.
  • Consistency: Aim for consistency in flooring choices to create a cohesive look throughout the house.
  1. Windows and Doors:
  • Energy-Efficient Windows: Upgrade windows to improve energy efficiency and enhance natural light.
  • Entry Door Replacement: Consider replacing or upgrading entry doors for both security and aesthetics.
  1. Roofing and Siding:
  • Roof Repairs or Replacement: Address any roofing issues and consider replacement if needed.
  • Siding Updates: Upgrade or change siding materials for improved curb appeal.
  1. Painting and Finishing:
  • Interior and Exterior Painting: Refresh or change paint colors to create a new atmosphere.
  • Trim and Molding: Install or update trim and molding for a finished look.
  1. HVAC and Electrical Systems:
  • Heating and Cooling: Upgrade HVAC systems for energy efficiency and improved climate control.
  • Electrical Upgrades: Ensure electrical systems can accommodate modern appliances and technologies.
  1. Landscaping and Outdoor Spaces:
  • Curb Appeal: Enhance the exterior with landscaping, new plantings, and hardscape improvements.
  • Outdoor Living Areas: Consider adding or updating decks, patios, or outdoor kitchens for extended living spaces.
  1. Professional Contractors and Permits:
  • Contractor Selection: Hire reputable contractors for specialized tasks, ensuring they are licensed and insured.
  • Permit Acquisition: Obtain necessary permits for structural changes or major renovations.
  1. Timeline and Project Management:
  • Realistic Schedule: Develop a realistic timeline for the remodeling project, considering the scope of work and potential delays.
  • Communication: Maintain open communication with contractors and keep stakeholders informed.
  1. Quality and Sustainability:
  • Quality Materials: Invest in high-quality materials and finishes for durability and longevity.
  • Energy Efficiency: Consider incorporating sustainable and energy-efficient features to reduce environmental impact.

House remodeling is a dynamic and rewarding process that allows homeowners to create spaces that align with their lifestyle and preferences. Careful planning, collaboration with professionals, and attention to detail are essential for a successful and satisfying remodeling experience.

DOOR INSTALATION - REPLACEMENT

Introduction:

When it comes to enhancing the aesthetic appeal, security, and energy efficiency of your home, installing or replacing doors is a significant undertaking. Whether you are upgrading your entry door, interior doors, or patio doors, a well-executed installation or replacement can make a substantial difference. This comprehensive guide will walk you through the key steps and considerations for a successful door installation or replacement project.

  1. Assessment and Planning:

    • Begin by assessing the condition of your existing doors. Look for signs of wear, damage, or poor insulation.
    • Identify the type of door you need (e.g., entry door, interior door, patio door) and the material that suits your preferences and climate.
    • Measure the dimensions accurately to ensure a proper fit.
  2. Choosing the Right Door:

    • Select a door material that complements your home’s style and provides the desired level of security and insulation.
    • Consider energy-efficient options, such as doors with insulated cores or low-emissivity (Low-E) glass for windows.
    • Explore various styles, finishes, and features that align with your aesthetic preferences and functional requirements.
  3. Gathering Materials and Tools:

    • Once you’ve chosen the door, gather the necessary materials and tools, including screws, shims, a level, a screwdriver, a saw, and insulation materials.
  4. Removing the Old Door:

    • Carefully remove the existing door, taking note of the hardware and any potential issues with the frame.
    • Inspect the door frame for damage and repair or replace as needed.
  5. Preparing the Opening:

    • Ensure the opening is level and square. Make any adjustments to the frame as required.
    • Install a sill pan to prevent water infiltration and rot.
  6. Installing the New Door:

    • Position the new door in the opening, using shims to ensure it is plumb and level.
    • Secure the door in place, following the manufacturer’s instructions for fasteners and hardware.
    • Test the door for smooth operation and proper sealing.
  7. Weather Stripping and Insulation:

    • Apply weather stripping around the perimeter of the door to enhance energy efficiency and weather resistance.
    • Install insulation around the frame to minimize drafts and improve thermal performance.
  8. Finishing Touches:

    • Complete the installation by adding trim around the door, sealing gaps with caulk, and painting or staining as desired.
    • Install new hardware, including handles, locks, and hinges.
  9. Security Considerations:

    • Enhance security with features like deadbolt locks, security plates, and reinforced strike plates.
    • Consider smart locks or additional security systems for added protection.
  10. Regular Maintenance:

    • Establish a routine maintenance schedule to keep doors in optimal condition.
    • Inspect and replace weather stripping as needed and address any issues promptly.

Conclusion:

A well-executed door installation or replacement can transform the look and functionality of your home while improving energy efficiency and security. By carefully planning, choosing the right door, and following proper installation procedures, you can ensure a successful and long-lasting result. Don’t hesitate to consult with professionals if needed, ensuring that your investment adds value to your home for years to come.
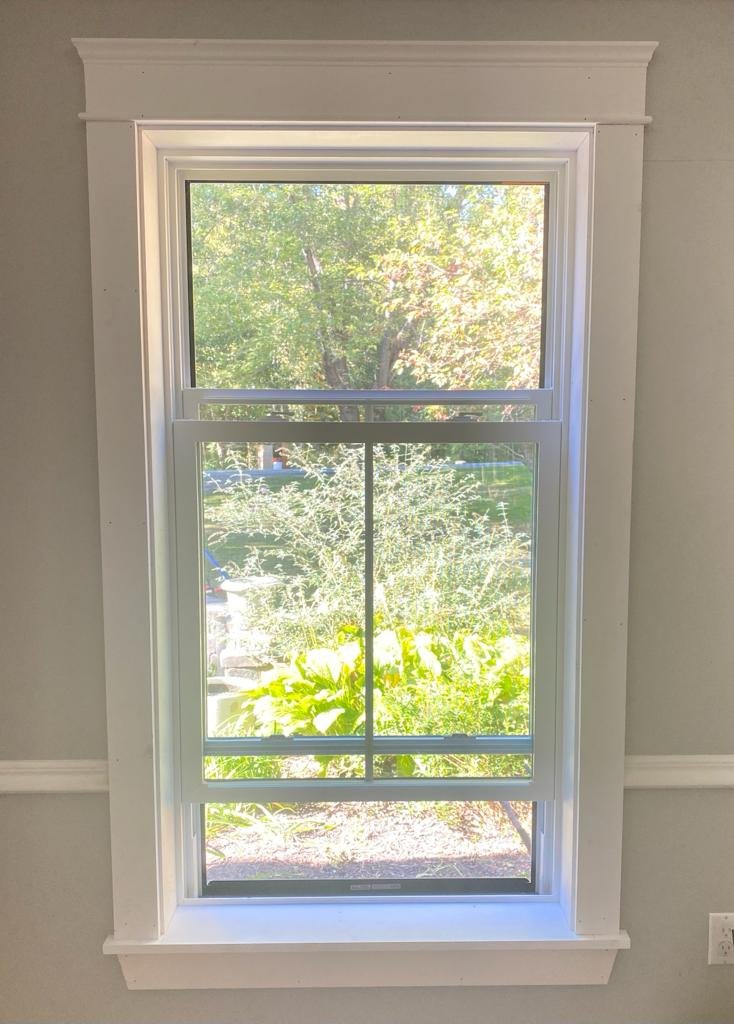
WINDOWS INSTALATION - REPLACEMENT

Introduction:

Upgrading or replacing windows is a significant investment that can enhance the comfort, energy efficiency, and aesthetics of your home. Whether you’re looking to replace aging windows, improve insulation, or update the look of your house, a well-planned window installation or replacement project is key. This comprehensive guide will take you through the essential steps and considerations for successfully installing or replacing windows.

  1. Assessment and Planning:

    • Evaluate the condition of existing windows, checking for drafts, damage, or signs of wear.
    • Identify the type of window suitable for your needs (e.g., single or double-hung, casement, sliding, or bay windows).
    • Consider energy efficiency ratings and choose windows that meet local building codes.
  2. Choosing the Right Windows:

    • Select a window style that complements your home’s architecture and enhances its curb appeal.
    • Consider the material, such as vinyl, wood, aluminum, or fiberglass, based on durability, maintenance, and aesthetics.
    • Opt for features like Low-E glass and multiple panes for improved insulation.
  3. Measuring and Ordering:

    • Measure window openings accurately to ensure a proper fit for the new windows.
    • Order windows based on the precise measurements and any additional customization.
  4. Gathering Materials and Tools:

    • Collect the necessary materials and tools, including screws, a level, caulk, insulation materials, and a pry bar.
  5. Removing Old Windows:

    • Carefully remove the existing windows, taking note of the condition of the frame and sash.
    • Inspect and repair or replace any damaged areas of the window frame.
  6. Preparing the Opening:

    • Ensure the window opening is clean, level, and properly sealed.
    • Install flashing to prevent water infiltration and provide additional protection against the elements.
  7. Installing the New Windows:

    • Carefully place the new windows into the opening, ensuring they are level and square.
    • Secure the windows in place using the recommended fasteners and follow the manufacturer’s installation guidelines.
    • Check for proper operation, making sure the windows open, close, and lock smoothly.
  8. Weatherproofing and Insulation:

    • Apply weatherstripping around the window frame to prevent drafts and improve energy efficiency.
    • Install insulation between the window frame and the opening to enhance thermal performance.
  9. Finishing Touches:

    • Complete the installation by adding interior and exterior trim.
    • Seal any gaps with caulk to ensure airtightness and water resistance.
    • Consider painting or staining the trim to match your home’s interior and exterior.
  10. Maintenance and Care:

    • Establish a routine maintenance schedule for cleaning and inspecting windows.
    • Check for any signs of wear, replace weatherstripping as needed, and address issues promptly.

Conclusion:

A well-executed window installation or replacement project can significantly improve the overall comfort and efficiency of your home. By carefully planning, choosing the right windows, and following proper installation procedures, you can enjoy the benefits of enhanced insulation, reduced energy costs, and a refreshed appearance. Don’t hesitate to seek professional assistance if necessary to ensure a successful and lasting result for your home.